
How to build a Route in Alumio
To understand the different steps and levels of building an integration Route within Alumio, let us consider the example as shown in the diagram below:
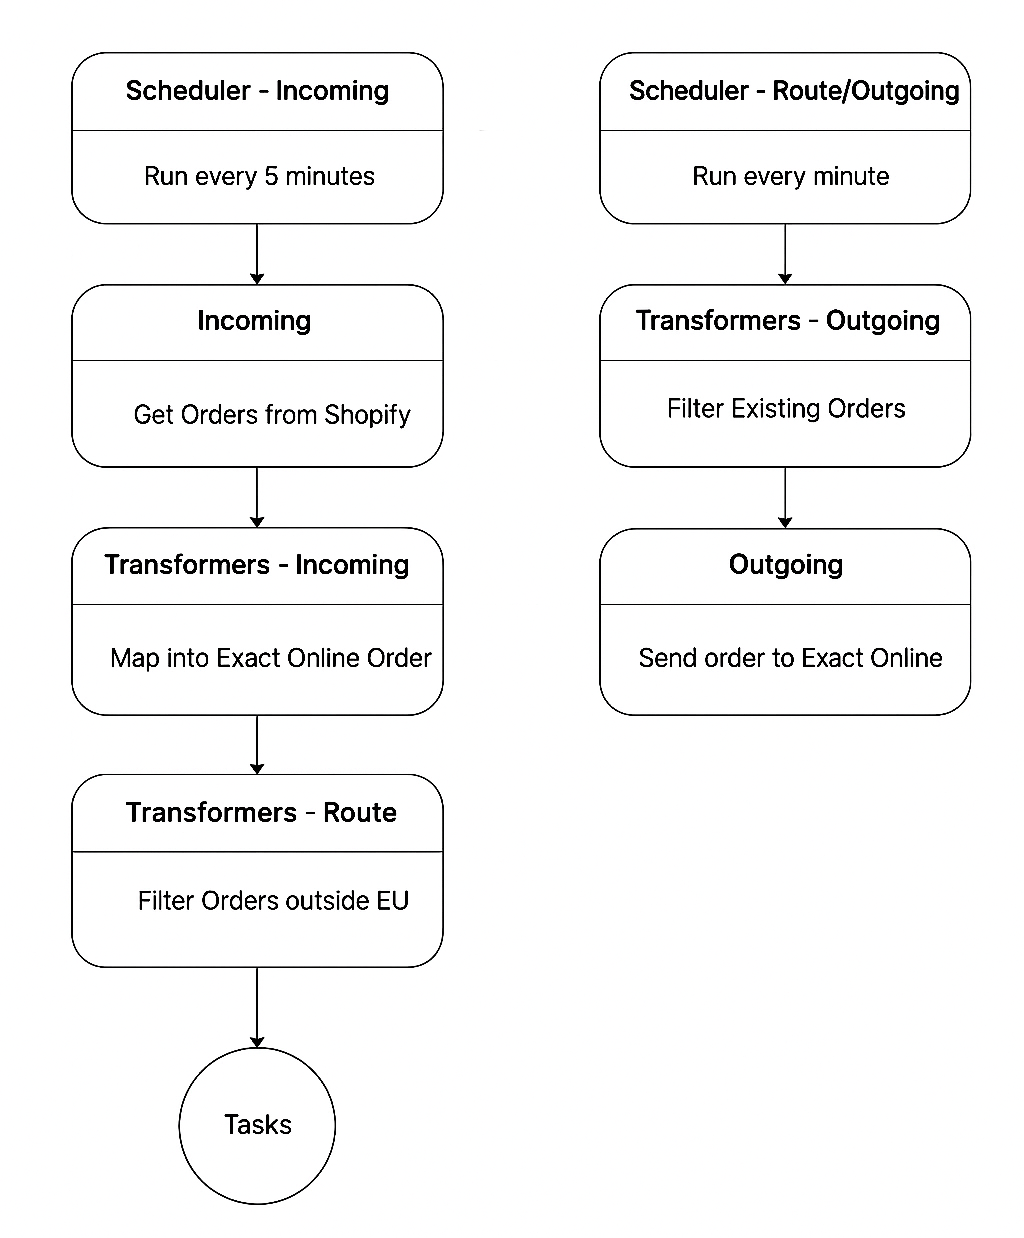
Example: Synchronizing Orders from e-commerce to ERP
Integrative Route objectives:
- Integrate Order details from an e-commerce platform into an ERP system.
- Retrieve new Order data every 5 minutes from the web shop.
- Modify e-commerce Order data format to match the format of the ERP we are sending this data to.
- Filter out Orders from outside the EU.
- Schedule transformed and filtered Order data from the e-commerce platform to be sent to the ERP every 1 minute.
- Prevent the resending of Orders that already exist in the ERP system.
Now, imagine how complex it would be to achieve this integration with all of these customizations without the Alumio integration platform. Inversely, as we take you through the different steps of Alumio’s Route-building, discover how it significantly simplifies and streamlines the overall integration process.
Building integration Routes step-by-step
To explore the possibilities of achieving all the integration goals listed in the course, let’s follow a step-by-step process to understand it better:
Step 0: Define and name your Route
- You have to start by naming the Route you wish to build to help distinguish it from other Routes in Alumio. As per our example, you can name the Route: “EU Orders from Shopware to Exact Online.”
- A unique identifier for this route configuration is automatically generated based on the name you give the Route.
- You can choose to give the Route a description to determine its specific objectives and to ensure that other users in your team can understand the Route’s purpose by examining it.
- However, to complete the remaining fields of the Route, you need to create an “Incoming Configuration” to determine what data the Route needs to retrieve and the “Outgoing Configuration” to the target application to send this data.
Step 1: Build an Incoming Configuration to retrieve data from a source app
A Route begins with fetching data from the source application into Alumio. As per our example, this determines how to retrieve new orders from an e-commerce platform, which will be sent via Alumio to a target application.
- To build an Incoming Configuration, you first start by giving it a name and description, just like with the overarching Route, which in this case could be: “Get EU order data: Shopware to Exact Online”.
- You then need to specify how Alumio should connect to the data source, i.e., the e-commerce platform. In the case of the Incoming Configuration, this involves selecting a Subscriber (e.g., HTTP subscriber, filesystem, database, etc.), or you can simply use an Alumio Connector if available.
- After configuring the “Incoming Configuration” by entering all the necessary details, you can “Run the Incoming Configuration” to successfully pull the data you wish to integrate into Alumio.
Step 2: Build an Outgoing Configuration to deliver data to a target app
The Outgoing Configuration specifies how the data that is retrieved from the source system (e-commerce platform) should be transmitted to the destination application (ERP system).
- To build an Outgoing Configuration in this case, you similarly start by giving it a name and description that helps distinguish it, which in this case could be “Send order data: Shopware to Exact Online.”
- You then need to choose how Alumio should connect with the target application, i.e., the ERP system. In the case of the Outgoing Configuration, this involves selecting a Publisher (e.g., Filesystem, SOAP, GraphQL, HTTP client, etc.), or you can simply pick an Alumio Connector if available.
The need for Transformers and Schedulers
After configuring the “Incoming Configuration” and “Outgoing Configuration” by entering all the necessary details, you can go back to the main Route configuration and manually run it to enable the integration between both applications. You can do this by adding the newly created Incoming Configuration and Outgoing Configuration to the main Route. By doing this, as per our example, you can technically send the order details that we aimed to send from the e-commerce web shop to the ERP successfully.
However, there are still two problems to solve as per our example:
1) We still need to Map (Order format) and Filter (orders outside the EU) within this incoming and outgoing data.
2) We still need to schedule how frequently the Route runs the Incoming Configuration (every 5 mins) and Outgoing Configuration (every 1 minute).
That’s where the Alumio Transformers and the Scheduler are crucial to limitlessly customizing and automating your integrations. Let's continue with steps 3 & 4 in the next lesson.
.svg)
.svg)
.svg)
.svg)
.svg)
.svg)